Showing posts with label review. Show all posts

Sunday, 27 January 2013

NYX Tango with Bronzing Powder - Confessions of a Tanaholic - Review and Swatches

Hi all my lovely readers, 

I've just come back so the little hiatus from blogging is over now for me and it's back to business as per usual! :) 

Today I will be blogging about an affordable bronzing powder from NYX Tango with Bronzing Powder Range. I bought the Confessions of a Tanaholic which is one of the best-selling bronzers from the range. I bought this bronzer from Cherry Culture for $7.50 USD (25% off) which is still going on now, CLICK HERE to visit the page. Shipping was less then $15 AUD for a very large order and took around 3-4 weeks to arrive to Australia (sales always take time to sort, package and deliver)!

Bronzer is a basic and staple part of most of my make up looks today. I think bronzer works well with every skin tone, even if you're already tanned, as it slims and defines and contours your face. I love the look of a good contour of people, I love how contour can be fierce and defined as well as natural with emphasis on the natural shadows of your face. It can be changed to suit each and every face and person and is just a great product for every make up user to own.

I love the packaging for this bronzer. 
The following pictures do not have any filter for a more accurate representation of the product!
Confessions of a Tanaholic features a wheel which contains three differing shades of bronzer and a middle section which is a highlighter/shimmer powder. The idea is to swirl your brush around whichever colours you prefer (focusing on the ones which you want the most, e.g. focusing on the outer wheel and avoiding the shimmer center for a matte bronzer), to get a custom colour suited for you.

Unfortunately this does not always work out that way. This compact is very small and requires a small brush and no matter what brush I use (even with my best kabuki brushes), the pigmentation of this bronzer is very light. It is very difficult to get a good amount of colour onto your skin with this product as the pigmentation is very low (it's not like it is in the pan!). Whilst this trait was reassuring to me when I first started using bronzer (as it is literally impossible to overdo your bronzer with this), it's incredibly annoying and troublesome to work with now that I've developed my skills with applying and using bronzers. :(

Underneath the powder is a compartment for the brush.
I do not use the brush which is included with the bronzer, it's too soft and flexible and nowhere near dense enough to pick up the required product for pigmentation to show up on the skin!

Ignore the 15, I wrote that there to remind me to throw it out by 2015!
I have yet to try to apply this bronzer wet, as wet applications allow pigment and product to be collected better and applied onto the skin.

Swatch of the powder (all the colours mixed together) on my light to medium skin tone.
I had to swirl my fingers in the pan about 3-4 times to get this level of swatch pigmentation, that much product for this little pigmentation means that there is a high risk of chalkiness or cake face! So just be careful if you're using this product for the pigmentation. There are much better bronzers on the market but to be fair, the better bronzers are easily 5-10 times the price of this bronzer.

In conclusion, whilst the pigmentation of this bronzer is lacking, the price and packaging are nothing to complain about. It is a good way to introduce and begin with experimenting with bronzers and it would suit very light skin tones well. I personally will not buy this bronzer again, but I am glad that I had it to lean on when I was first beginning with the product.

Thank you once again for taking the time to read this blog entry, I hope this has helped out someone with their choices on the market. Please subscribe/comment/favourite/bookmark if you have the time, all feedback is much appreciated. Please keep in mind that these reviews are my own opinion and others experiences may differ from mine. :)


Stay Beautiful! xx

Tuesday, 8 January 2013

Naturgo Miracle Face Mask - My Favourite Peel Off Mask

Hi everyone! 

Since my last review was insanely long, I decided to do a super short review telling you all about my absolute favourite peel off face mask which I have been using for many years. I was first introduced to this mask by my Aunty when I was still in high school.

A bit about my skin:
> Oily combination skin with dry patches. Yeah. You think you've got it bad.
> Acne prone, I had terrible cystic hormonal acne starting at the age of 14! It only got worse and worse (hitting its' peak at around 16-17 years of age), I needed to see a dermatologist. It needed to be medicated and even today, after finishing university, I'm prone to a couple of breakouts (usually around a certain time of a month - if you know what I mean) hahaha ;)
> Thank god my pores are not that bad, I actually have to thank this mask specifically for that. :)
> Sensitive skin (I'm allergic to some chemicals in cosmetics)!

About this mask (why I think it's so incredible and absolutely everyone who has tried it is obsessed with it):
> It's a peel-off mask, very simple to use. All you do is apply the cream formula with your fingers to your face, wait 30-45 minutes for the mask to dry completely and peel off! Warning: peeling off the mask is painful the first time you do it, I've gotten used to it by now and the results are very much worth it. ;)
> After you peel it off:
  • When you touch your skin, it feels smooth
  • Removes all blackheads/whiteheads, this formula actually gets into all your pores and rips off any gunk that's in it. You can actually see it on the black mask once you remove it, even if you take care of your skin and deep clean often, this mask will take off what you miss!
  • Waxes off tiny peach fuzz hair on your cheek and face. Just a heads up, maybe put some Vaseline or moisturiser on your eyebrows before applying this mask, because it will rip that off too if it comes in contact and dries. :)
> Suitable for acne-prone and sensitive skin!
> I suggest only using this mask once every 1-2 months! Do not over-do this mask or you will get dry patches of red skin (if this mask doesn't have any gunked up pores to clean out, it will clean the top layer of your skin off)!
> Gradually reduces the size of your pores over time! :)
Super affordable, you can buy this online through eBay or just at any Asian store (like I do)! It's about $2.50 a mask sachet.


It comes in an orange sachet! 
The back.
Once you peel it off, you can literally see the stuff it rips out of your pores. This helps your pores and skin by preventing them from being stretched too large which will reduce oil production on your skin (and T-zone area), and help prevent any future breakouts. :)
Sorry for the overuse of smiley faces, I really love this product and I know that you will too. Just try it out and let me know how it goes for you! :)

Thank you for taking the time to read this entry, subscribe/follow/bookmark/favourite me if you have the time. These opinions are my own opinions, I am not affiliated/compensated to do this entry at all or with the brand/product.


Stay Beautiful! xx

Saturday, 29 December 2012

Current Benefit Box O' Powders Review

This whole week has been impossible for posting! I'm so sorry for the lateness of every post this week, since the entire Christmas eve, day and boxing day week is over, everything should return to normal! :)


I like variety and I'm sure you do too which is why I've avoided posting about anymore Benefit products, Sigma Products, etc. Since I do tend to talk about my favourites and shift the focus away from other products. I've decided to do products which I do not like as well as products which I enjoy. So not only will my blog be letting people know which products are amazing but also which products are terrible! (Note: All of these are my own personal opinions!). :)

So I think it's been long enough: Benefit Box O' Powders review time!

I decided that instead of reviewing each powder box individually (which may take a while), I'm just going to review every single box which I own in one simple, easy post! Partly because of laziness and partly because I though you'd appreciate less reading. ;)

I'll do an in-depth version with swatches and examples in make up application later on, promise. :)

All of these powders were purchased from the official Benefit Website, individual links will be below every product review. Also, all Benefit Box O' Powders have a very light and pleasant scent to them (they're quite famous for their scents)!  

All the powders which I own.
I do not own every benefit product ever created, believe it or not ;) These are the only powders from Benefit which I have tried and tested! I hope this helps some of you, also: please leave suggestions in the comment section of any powders which you enjoy using so I can check them out! :)

Hope you enjoy the review. :)

Hoola.
I am washed out. Not as badly as some people but I am pale enough that bronzing is a definite part of my everyday make up routine. I actually get told that I look sick without bronzer. I've been through quite a few bronzers and this one has always been my fall-back. Kind of like a fail-proof product, this bronzer is perfect for most skin-tones. It's very blendable and is perfect at imitating the natural shadows of your face.


Hoola by Benefit was my first ever bronzing powder so there have been some good memories using this powder. It's a completely matte light brown colour with no orange undertones, so you won't look like a spray tan gone wrong. Hoola is a very well-known bronzer and a favourite product for a lot of people. I personally use Hoola daily for contouring my nose subtly but would lean towards a more deeper colour for intense contouring of the cheek bones!

Hoola retails for $28.00 USDCLICK HERE to view the page I bought it from. I bought the Double the Powder! online exclusive pack for $34.00 USD which includes Hoola and Thrrrob, CLICK HERE to visit the site!

Hervana.
I bought Hervana simply because it's a matte blush colour and I don't have a lot of matte blushes. The blush looks amazing and very subtle on any skin type. It actually looks like you are not wearing any product on your cheeks at all and the colour is buildable. That being said, I would not use this blush if you are looking for a highly pigmented cheek colour!! It is incredibly natural, subtle colour which does make a slight difference to your natural look.

Hervana retails for $28.00 USD, you can CLICK HERE to view the page!

Sugarbomb.
Sugarbomb is a very warm, flushed type of cheek colour. It is a satin blush colour with buildable colour. The four colours are: soft plum, peach, pink and rose. They work well separately and together as a multi-coloured blush. I found that this blush complimented warmer skin tones well and can be used alone for a quick flush of colour on simple days out.

This blush retails for $28.00 USD and you can purchase it by CLICKING HERE!

Dandelion.
Dandelion is a big favourite of mine! It's a brightening face powder which you can use as a light pink blush or sweep over your entire face for an enchanting glow. This blush evens out blotchy skin tones and brings light into dark areas which allows your complexion to glow subtly. It is a satin type blush and has a light sweet scent which wont overpower any fragrance you choose to wear.

You can purchase Dandelion for $28.00 USD by CLICKING HERE.

Bella Bamba.
Bella Bamba is a highly pigmented, shimmer blush colour. I own the deluxe sample size of the blush and have only used it on a few occasions. I find the blush is intense on my skin tone and would better suit people with darker, olive skin tones. When I do apply it, I do it with a very light hand and that alone is more then enough blush for even my more dramatic looks! I keep this in my emergency make up kit in case I ever need a bold blush colour.

That being said, I've found that some people of all skin tones absolutely love this melon-coloured blush! It's just not for me, personally! :)

You can buy Bella Bamba (god that name is fun to say) by CLICKING HERE for $28.00 USD.


Thrrrob.
I got Thrrrob from buying the Double the Powder! online exclusive pack for $34.00 USD which includes Hoola and Thrrrob, CLICK HERE to view the offer. I ended up enjoying this blush because it's a lovely light pink colour with a larger amount of shimmer compared to the other blushes. This blush looks amazing when layered on top of other blushes to add more dimension to your cheek colour and highlight your cheekbones.

CLICK HERE to purchase Thrrrob individually for $28.00 USD.

The catchy phrases on the packaging give you a general idea of uses for the powders. ;)

TheBalm Hot Mama & Benefit Bella Bamba Blush!
I decided to include pictures of blushes I own and love to show how they compare with the Benefit versions. TheBalm's Hot Mama blush (very famous blush) is a warmer and lighter colour compared to the Bella Bamba by Benefit. Bella Bamba is a melon-pink colour which is highly pigmented whereas Hot Mama can be used for everyday make up looks for any occasion.

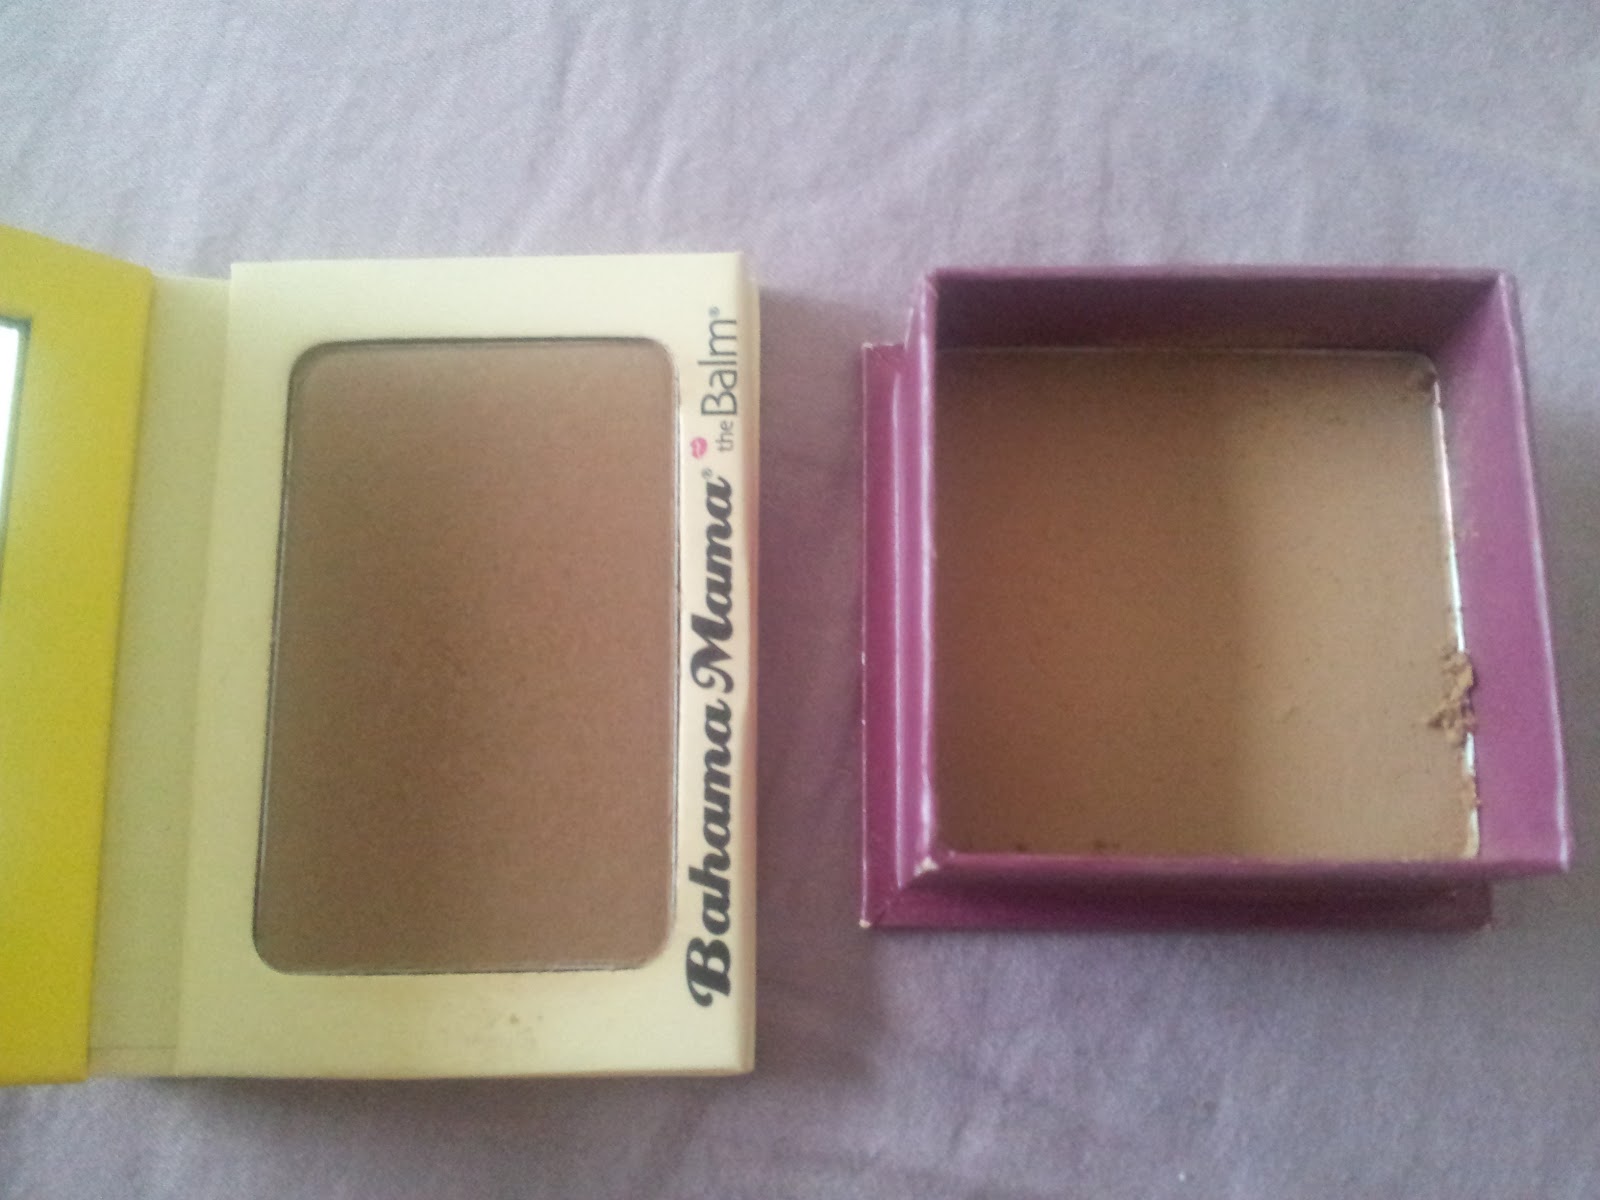
TheBalm Bahama Mama and Benefit Hoola Bronzers!
Bahama Mama is a much more dramatic, deeper, matte brown colour then Hoola. I would not use Bahama Mama to contour my nose (that would make me look angry - hahaha)! But I reach for the Bahama Mama for cheek contouring. Hoola is a subtle colour which can be used for any type of contouring (especially for natural looks). They are both great bronzers for my light-medium, yellow undertoned skin tone. They have no orange undertones and no shimmer!


I hope this review helped someone, much love to all my readers! :)


Stay Beautiful! xx

Thursday, 27 December 2012

L.A. Colors Auto Lipliner Review and Swatches

Okay this time the lateness of this entry is not due to any fault of my own: my internet literally decided to kill itself during boxing day. There was nothing I or anyone in my family could do to repair it and uploading remotely was impossible - trust me, I tried. :(

Here's yesterdays' post:

Every person (male or female), anything and anyone who is starting off with make up or has been into make up for a while, should know and own the simple, humble miracle which is lip liner! Lip liners (are supposed to) prevent leaking of lip colour by providing a good base, line the lips for different looks, intensify/change any lip colour which is layered over the top of lined lips, prevent feathering of the lips, and compliment a wide variety of make up looks and skin tones!

If you find a good lip liner, it may do most/all of these things and more. There are liners which plump the lips, are highly moisturising, and more! *cue applause for this innovative product*

If you want some good quality and affordable lip liners to start or add to your growing collection, I very highly suggest L.A. Colors Auto Lipliners! These liners are incredibly soft and simply glide onto any surface smoothly. The colour payoff is amazing, the formula is smooth and prevents feathering, the packaging allows for precise application of the liner to a variety of lip shapes and sizes. :)

L.A. Colours Auto Lipliners which I own.
So I bought three of their lip liners in the following colours:
- AL565: Pinky
- AL561: Nude
- AL569: Fiery Red

From Cherry Culture for $2.50 USD each, there is a wide selection on the site and shipping was quite inexpensive to Australia for my large order! :) CLICK HERE to visit the exact page I used to purchase these lip liners.


Twist up function.
These liners have a twist up function so there's no sharpening needed to get a precise line. Remember that when you're using twist up products, not to twist up too much or the product might break off! I would twist to the level shown in the picture above or just a bit higher to prevent breakage. Although this all depends on the amount of pressure you use normally! :)

Swatches of the colours.
Let me start off by saying that these lip pencils are amazing; they glide on perfectly/very easily, are very pigmented and contain shea butter which conditions your lips to prevent feathering of any lip product you put on top. Personally, I love using Pinky to line and completely fill in my lips then putting on any pink gloss - these lip liners can be used by themselves if you want a matte-lip look as well!


I'm not a fan of the Nude colour, it's far to dark and with no pink undertones (like the Too Faced Perfect Nude pencil has - this by the way is my favourite nude lip liner of all time!). Nude lip colours are always tricky since every lip has a natural colour/pigmentation which is suited to the individual. Therefore, while this nude pencil did nothing but wash me out, it may suit other lips better.

I love wearing Pinky by itself, it's a beautiful light mauve pink colour which is just amazing and unique. I've gotten asked what lipstick I was wearing before with this liner on and some compliments so I'm very happy with this colour. It's difficult to describe but try it out! Hopefully you'll love this as much as I do - or maybe this is one of those "just me" things. ;)

Fiery Red is a deep and dark red colour with blue undertones. It's good for putting a bright red over the top to balance the look and creating ombre lip colours.

Anyways, thank you so much for checking out this post on my blog, all feedback is much appreciated and loved! Everything I review and bought with my own money so these are my honest opinions. Since they are my own opinions, they may not agree with someone else's. Make up is diverse, just like the people who use it - let's all have fun whilst sharing our experiences!


Stay Beautiful! xx

Tuesday, 25 December 2012

EcoTools Beautiful Expressions Kabuki Set Review

Firstly, I would like to apologise for not posting yesterday. Christmas eve got a little out of control with my family and such so I actually forgot until around 11pm that night! Anyways, I'll be sure to let all of you guys know beforehand next time I do something like this! Just a heads up, I will be going out a few times this week but everything should go as per usual! Sorry again and here's the review which I was planning on giving you yesterday! :)

Urgh, so many calories! :)

EcoTools is a well-known, inexpensive, drugstore brand. Its main selling point is the length it goes to when promoting environmental awareness and support. Today I will be reviewing the EcoTools Beautiful Expressions Kabuki Set (limited edition 4 piece set): a completely environmentally friendly, synthetic brush set.
 The set features four full-sized kabuki brushes.
To be honest, I believe that this set must be one of their best-selling of all time. I've seen these four kabuki brushes on basically every dresser/bathroom/make up table in history nowadays. So if you don't own this set, someone you know probably does!

The brushes are all very small and will easily fit into any type of travel bag invented. Don't be surprised when they arrive because despite being sold as "full-sized", I own travel-sized kabuki brushes which are larger then these!

I bought these off iHerb for $13.95 USD and I paid $12 USD shipping (I choose a quicker shipping option for my first order since it was very large), CLICK HERE to go to the site. You can use the code: VAF312 for $10 off your first order over $60 or $5 off your first order under $60! That's pretty much free shipping since the cheapest shipping option is $4.

DISCLAIMER: All products have been bought and paid for with my own money and I am not endorsing/paid for by iHerb at all, I have the code which will discount your first offer which is provided to everyone after their first order. I wish I knew a code when I first ordered but I didn't use one so I paid the extra $10. Feel free to use any code at all that you wish, I'm not going to force you to use mine! :) Okay, back to the review! :)

Bronzed Angle Kabuki Brush.
The bristles on this brush are too soft and flexible to be used to apply bronzer. I use this brush for either applying setting powder or blush colour. I prefer my contouring/bronzer to look defined rather then "snooki" (everywhere on the face - if I wanted that I'd get a fake tan) if that makes sense. ;)
Conceal Round Kabuki Brush.
This brush is incredibly soft and dense which makes it ideal for use with liquid and cream products since it will not absorb too much product into the bristles; and the softness means that it doesn't disturb your skin during application too much! It is a nice brush to have for concealer or liquid highlighter application when contouring your face.

Contour Domed Kabuki Brush.
This is the brush which I would use to apply and blend out bronzer if I used this kit. Although it isn't my favourite bronzer brush, it does a good job of precisely applying the bronzer or powder highlighter to the areas of my face which I want to focus on. A very decent brush - especially considering the price.

Buff Flat Top Kabuki Brush.
This is a semi-dense flat top brush but it's too flexible and soft for liquid and cream product application. I find that if I use this brush for liquid and cream foundations it absorbs most of the product and leaves a streaky application. Best for application and dispersion of powder make up since it prevents any cake face with it's large amount of bristles. In other words: the bristles are dense, but not dense enough for use of foundation application (unless it's mineral powder foundation)! :)


In conclusion, this brush set is definitely worth the money. Although none of these synthetic brushes are revolutionary or have made it into my favourites collection of brushes, it is still a brilliant brush set to work with when you are beginning to explore with different kinds of make up brushes and learning different techniques. If you can use these brushes well - you can use any brushes. ;)
Kabuki-Sized Brush Guards!
I also thought I'd also share how I maintain the Kabuki brush shapes and store these Kabuki Brushes (since they do not come with their own carrying case)! These will prevent any damage or splaying of the bristles and maintain the density of the brush. :)

I wash my brushes after every single use: no shedding or bleeding of colour was observed! The shape is maintained through brush guards so I don't know how they'll do without them (since they are very easily splayed during make up application). :)

Thank you once again for taking the time to read this review on my blog, much love goes out to all my readers. xx

Feedback and comments are much appreciated and loved, thank you to everyone who does!

Please subscribe, follow or bookmark/favourites this page if you have the time! :) Thanks again lovelies.


Stay Beautiful! xx

Monday, 17 December 2012

Elizabeth Arden Exceptional Lipstick Review and Swatches

Although I prefer lip stains over all types of lip products, I do own a fair amount of lip sticks. When I reach for a lipstick, it must be moisturising, pigmented (my lips feel suffocated and heavy if I have to layer lipstick on too much), and long-lasting (the best part of a lip-stain!).

Introducing the Elizabeth Arden Exceptional Lipstick Collection (I own two of the colours from this collection):

The two lipsticks from the Exceptional Elizabeth Arden collection which I own.
I received these two lipsticks when I purchased the Elizabeth Arden Red Door Set (contained an eyeshadow palette based on the Red Door fragrance, mini eyeliner, and some other things!) for around $70 AUD at Cosmo Cosmetics (in-store).

38 - Beauty (and swatch).
Beauty is a light plum colour with a matte finish. Despite the matte finish, it feels moisturising (although I recommend moisturising your lips before applying any lip product to it during make up application) and there has been no feathering of the colour. It is fairly pigmented - I usually layer on about 2-3 layers to achieve the intense colour which I want.

25 - Starlight (swatch to the left - the right swatch is Beauty).
I absolutely love this lipstick colour - Starlight! It was very unexpected but this lip colour is the perfect nude lip colour for me. It is an intensified version of my natural lip colour and is perfect for daily use. The finish is semi-matte and the formula is pigmented and moisturising. I adore this lipstick because it suits a wide range of looks for everyday use! :)

In conclusion, these lipsticks are inexpensive (when bought in a set/pack), and good quality. They aren't orgasmic or anything, but they do what a lipstick should do. Nothing revolutionary but great value for price that I paid. If you want a few good lipsticks, these may be the one for you! Please let me know if you have tried these lipsticks and your own opinions on them - I'd love to know! :)

These opinions are my own, so what works for me may not work for someone else and vice versa! I made this blog in the hope that some of these tips/reviews and swatches may help someone out there as well as for my own personal enjoyment (make up is a passion of mine!).

Once again, thank you all for taking the time out of your day to read my blog, much love to all of you! Any feedback/comments/suggestions you leave will definitely be taken into account and much loved and appreciated! :)


Stay Beautiful! xx

Friday, 14 December 2012

Travalo Review and Refill Tutorial

I can't exactly recall when I had first heard about the Travalo (it's one of those things where I can't remember at the top of my head but if I hear a certain word, it will trigger the memory and I'll remember where I heard it from originally). But I recall being immediately interested in it. Travalo is - in my own words - a tiny portable spray capsule which you can refill as often as you need too with whichever fragrance/fragrances you like for on-the-go touch ups or when you're running late and forget to wear any perfume (this has saved me more then once - I'm usually late for everything...)!

Travalo - Front.

Travalo - Back (holographic inscription - won't fade)!

The Travalo is just under 9 cm (it's 8.6cm if you want to be specific) in height and is capable of spraying up to 65 times (when full). The best part about this packaging is that it is made out of aircraft grade aluminum which makes the geek inside me scream with happiness. This means that it's lightweight and incredibly durable, so you can throw it into any bag without a second thought!

The original idea of the Travalo was to allow people to fly on a plane with their favourite scent. The capsule has it's own pressure regulating system which makes it safe to fly with. There are also no dangerous glass parts so there's no risk of shattering/hurting yourself with this product! :) Perfect for someone as clumsy and uncoordinated as myself...

Add caption
You can see the little spray nozzle (aka. "fragrance atomizer") which releases a very fine mist and not a jet of fragrance! :) The entire packaging is very secure and airtight, it is a very well-made product and I have complete confidence in this bottle to last through bumps and scrapes and all sorts of horrors whilst traveling! ;)

The mechanism at the bottom of the capsule.
This little rubber bit at the bottom of the capsule is how the you full this capsule with any fragrance in a matter of seconds!

HOW TO FILL/RE-FILL A TRAVALO:


STEP ONE: Remove the top nozzle of your favourite perfume (don't worry, it can be put back on!) ;)
STEP TWO: Press the bottom of the Travalo to the end of the nozzle of your perfume bottle.
STEP THREE: Push the Travalo in up and down motions to fill with fragrance, keep an eye out for the see-through level indicator (make sure your Travalo is NO MORE THEN 3/4 FULL or you'll risk damaging the pressure system of the Travalo!) 
FINISHED! Replace the cap on the perfume bottle and have fun! :)

In conclusion, this little handy product has very quickly become an item which I simply cannot live without. I need to buy extras in every colour! Australia still has yet to realise its own version of this product, but the idea is so unique and just obviously simply that I can't believe I didn't own one for so long before!

I bought this for $21.23 AUD with free shipping to Australia from Feel Unique, shipping took around 4 weeks to Sydney (similar to Beauty Bay in that sense). There is a large variety of colours and they often have specials! CLICK HERE to visit the exact page I bought this from, there's currently a 4% off discount applied to these so you can get them for $20.38 AUD. :)

ADDIT: I recently found out that these can be bought in-store in Australia from Myers/David Jones or Terry White Chemist! Off you go! :)

I recommend for anyone out there, male/female, it does not matter (the bottles come in a variety of different colours!), because you'll find yourself reaching for this more then once! I had no idea what a dependence I would develop for this product until after using it for a few months. You no longer have any excuse to smell anything BUT delicious from now on! ;)

Have you tried out the Travalo? If yes, please tell me what your experiences/uses are for this little capsule? If no, are you interested in trying out this product? For future giveaway reference! ;)


Thank you so much for taking the time to read my blog, all feedback is much loved and appreciated! These opinions are my own opinions and I'm not sponsored by anything/anyone. I understand that people may not share the same opinions as myself and I enjoy seeing how different people find the same product. Differences make us all unique! :)

Stay Beautiful! xx
Tuesday, 11 December 2012

Revlon Lip Butters Review

The colour of a lipstick with the soothing, moisture of a lip balm - what a dream product! That's exactly what these Revlon Lip Butters claim to do. I've heard a lot of hype surrounding these lip butters but from the ones which I've seen from stores previously, there weren't very many which appealed to me. I eventually bought these when they started being sold in sets, I just couldn't justify spending the full RRP for products which I was not very interested in purchasing (despite all the hype).

So.. I got four.

Of course, I eventually caved when the sets came, and bought these which came in a pack from Myers some time in November 2012. *guilty face* Don't lie, I know you have some too...

080 - Strawberry Shortcake.
Strawberry Shortcake is a very light baby pink colour which I personally think would suit light skin tones amazingly!

This one took a while to grow on me, I try to avoid lip colours which are lighter then my skin tone because they make me feel and look washed out and sickly. I've found a way to wear this colour by using a darker pink lip pencil and filling in my lips (or applying a deep lip stain) and then applying this lip butter on top!

It's more moisturising than a lip stick, the colour pay off is actually quite decent (but not the same as a lipstick, like they claim - unless the lipstick is very sheer).

Bottom Swatch : Lollipop.
I wore this lip colour all day at Stereosonic this year and was very pleased about how easy it was to use. It's very pigmented and moistursing. The colour is a bold magenta pink with a glossy finish! The only issue I had was how quickly this product wore off my lips (within an hour or two - not eating!). Next festival, I'll definitely be using a more staining colour but it's still a lovely, vibrant colour for a day/night out! :)

Top Left Swatch : Peach Parfait.
I love anything that's peach but I do not like this lip butter at all. It has huge chunks of glitter in it. The glitters are so big that it feels as if you're applying a thin layer of lip expoliant! The glitter specks will end up around your mouth/on your face in a few hours - definitely not a good look. It looks like you're wearing really cheap, little-girl lipstick, very unpleasant feeling on the lips.

Definitely not the consistency of a lip balm and minus points for trying to imitate the satin texture of a lipstick with freaking glitter. I was most excited to try this one, the colour is definitely nice, but come on, are you even trying? If you had a different experience with this particular butter or any of the other lip butters, please let me know! Maybe I just got a really bad one!

Bottom Left Swatch : Sugar Plum.
This is a smooth muted deep plum colour with blue undertones. It's a nice winter colour but I can see it being used for spring/autumn as well! :)

The only issue if is the colour payoff, you have to layer one a few times to get the deep plum colours of a lipstick but it is very moisturising!


In conclusion, these lip butters are worth trying out but if you don't - there's really no big loss. Whatever you do - do not pay full price for these lip butters, you can buy them in sets from Myers (I think it was 3 for $29.95 AUD or something). Quite honestly, they're not worth the $25-29 AUD some retailers charge. There is not a substantial amount of product (a lot less then what you find in a full-sized lipstick or lipbalm) and whilst there are some real lovely jewels in this collection, it just didn't impress me that greatly to match the large amount of hype it received. This product is the result of some very good advertising. ;)

These opinions are my own, I'm sure that there must be some readers who absolutely love these lip butters but to me, it's better value to buy a moisturising lipstick. Better colour payoff, longer lasting, and a lot more product for roughly the same price!


Thank you for taking the time to read my blog, feedback is much loved and appreciated! Thank you all, you inspire me! :)


Stay Beautiful! xx

Monday, 10 December 2012

NYX Rouge Cream Blushes Review and Swatches

If you are looking to experiment with different types of blushes - cream blushes in particular - NYX Rouge Cream Blushes are a good and affordable starting point! Cream blushes are sometimes preferred over other types since they are highly blendable, highly pigmented, have long staying power, and look incredibly natural (even in direct sunlight - as opposed to some powder blushes which run the risk of looking chalky, or stains which risk streaking). There are pros and cons of every type of blush, everyone is different, so you may want to experiment with blushes which suit you best!

I have owned, tried and tested these blushes for the past few months so that I can give you my honest opinion on them. Cream blushes are very well-suited for people with dry/combination skin because of the moisturising benefits of this formula as opposed to powders and stains. I have oily/combination skin so I found that the best way to apply and use these blushes is to blot the blush after application and before blending! Then apply a setting/translucent powder over the top to set the blush. This way, the blush will not slide or leak onto other areas of the face and you will not get the dreaded oil-face! :(

NYX Rouge Cream Blushes that I own.
These blushes retail for $6.75 USD each but are currently on sale for $4.90 USD each. Since I bought these such a long time ago, I can't remember the exact price which I paid. I bought these from Cherry Culture which always has 15-25% off sales every few months! I paid around $15 AUD in shipping for my very large order. CLICK HERE to visit the page where I bought these blushes!

CB02 - Natural (sorry for the mess, I've used this blush more than once!)
CB02 - Natural (Back).
Natural is my most reached for blush colour. It reminds me of romantic dates and spring! It's a peachy light pink colour which would suit light to medium skin-tones very well. This blush is pigmented but subtle enough to not draw attention away from the rest of your make up!

CB01 - Rose Petal.
CB01 - Rose Petal (Back).
Rose Petal is a warm peach colour. It would suit literally any skin tone that I've tried this out on! It's an amazing colour, very subtle though but a perfect blush colour nonetheless. It gives the slight flushed appearance to the skin, if you want to try out a peach cream blush - this is the one for you! :)

If you have yet to try out peach/coral colours for blush, do it. Shhh, don't ask questions. You'll thank me later. ;) *creepy*

CB05 - Glow.
CB05 - Glow (Back).
Glow is a bright and intense deep pink colour. This colour seems to suit medium to dark skin tones, in my opinion. This colour is incredibly pigmented and the intensity of the colour will draw attention to the cheeks. I find that I rarely reach for this colour since it's difficult to use with natural looks, or most make up looks which emphasise the eyes or lips and not the cheeks. However, I'm still glad I have this blush in case I ever do feel like doing a bold cheek colour! :)

Natural (First), Rose Petal (Middle), Glow (Last) Swatches.
Blotting the blushes will remove the shine you can see in the image and prevent sliding of the colour. I find it easiest to apply these blushes with a stippling brush or a damp wedge sponge and a light hand! Blot with some blotting paper and blend out after blotting for the most natural look.

All these blushes are PETA Approved Cruelty Free and hypoallergenic. The packaging states that the recommended expirary date is 12 months from first use. Also I thought it'd be worth mentioning that these blushes do not dry out! The packaging is very airtight. :)

I hope this entry helped someone. Thank you so much for taking the time to read this entry, all readers are much loved and appreciated. Please bookmark/favourites/subscribe/follow this blog if you like it - it really makes me smile. :)

All feedback is very much appreciated! I always want to hear what you want to say! <3

All opinions are my own, make up is meant to change to suit you - just because I like it, doesn't always mean others will think the same. Respecting each others personal tastes is what makes life interesting! :)


Stay Beautiful! xx