Thursday, 29 November 2012

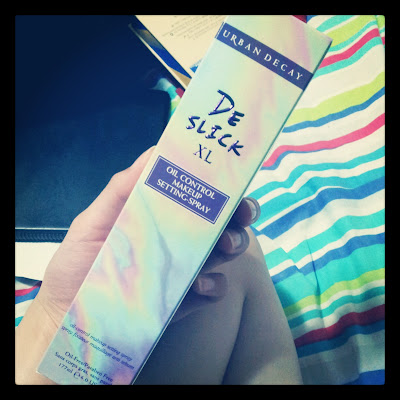
Urban Decay De Slick Make Up Setting Spray Review

For girls like me who put time and effort into their make up for special events and occasions, we expect that make up to stay in place at least! Similar to primers and many other cosmetic products, make up setting sprays are now doing a lot more than simply keeping your make up in place for longer then usual. There are make up sprays which improve photography, sprays which hydrate the skin, sprays which decrease the appearance of fine lines, sprays which firm and tone the skin, sprays which mattify the skin, and the list goes on!

Today I will be reviewing the Urban Decay De Slick Make Up Setting Spray (I paid $35.26 USD) from Beauty Bay, CLICK HERE to visit the exact page with this product.

I got the largest size: 177 mL - trust me, I need it.
This spray claims to prevent and control the production of sebum (oil) on the skin for hours in any weather. As I keep mentioning, this is a must for anyone in Australia or that entire tropical/Pacific region of the world.

The actual bottle.
A quick note about the spray nozzle: Unlike the Australis brand, this spray nozzle allows for a gentle fine mist to be ejected out of the bottle. It's not harsh and half-the-time (because I was so used to using the Australis bottle), I didn't know I had it on. The application gets an A+!

As you can see, this bottle is about the size of a full size make up brush.
The only way I can possibly review this item is by using it and trying it out for the ultimate test: Stereosonic Festival in Sydney Australia. It was towards the end of spring and a few weeks away from summer, the Australian spring is some countries version of summer.

Temperature: 24-30+ Degrees Celsius. Even in the shade, it was ridiculously, unforgivably hot!
Scene: crowded music festival with 40,000 + people, an open stadium exposed to direct sunlight, hard-style/house/electro music everywhere, and - of course - crazy energetic dancing!

Before the festival - Right after I finished my make up
2-3 hours post make up application - at the festival with my best friend!
10-11 hours post make up application - Towards the end of the festival!


FINAL VERDICT:
The spray worked much better than my other make up setting spray such as my Australis one. It kept my face matte for a good few hours when my face would usually be oily after about 1 hour, it stayed matte for about 4 hours (probably would've been more if I wasn't dancing like a maniac the whole day/night).

> The spray however did not stop oil production, there was oil there - as per usual - after the first few hours (it was good while it lasted), but don't expect any miracles (especially with the Australian weather).
Despite sweating, the make up stayed on all night! This could be as a result of good make up or the setting spray (or a combination of both) - just thought I'd mention it.
> Shoulder rides are fun as hell!

In conclusion, this spray is better than other setting sprays and certainly assists in keeping make up on. In the area of oil control, maybe my face is just cursed but it had little effect. Still, whenever I use it for less exciting events such as normal every day wear, it does keep my face matte to semi-matte for many hours (5-6 hours) which is better than nothing!

Stay Beautiful! xx


Miracle Treatment - Coconut Oil Treatment Review

My skin type is oily-combination meaning that 85% of the time my skin is oily as hell and the other 15% it's dryer than my jokes. The dryness usually comes in small, intense patches around my nose and mouth area and previously these patches have taken at least 2 weeks to heal even with frequent use of moisturisers (mainly QV), sunscreen, and exfoliation!

A bit of my regular skin-care routine before we continue: I cleanse my skin with QV cleanser at least two times a day (and that's on days I don't wear make up) mainly because I'm a massive germaphobe. So cleansing is a must for me to feel clean.

Back to the issue, I also have insanely dry lips even in the humid summers and it gets worse during the cooler months. I have a habit of picking at my lips when I'm really concentrating on something (e.g. I usually come out of exams with my lips bleeding - depending on how difficult the exam was). I'm not sure why or when I developed this habit and it's annoys me to no end!

My hair is 3/4 of the way down my back, I've been growing it out for a long time by getting regular trims off the end at my hairdresser. Adding to this, I've had my hair coloured at a variety of salons countless times. I always feel like changing my hair colour - although right now I'm quite satisfied with my current colour. I also use a hair curler or straightener every time I go out!! Needless to say, my hair has been through a lot of bad stuff but it's managed to keep most of it's health so far. I (and everyone in my family) was born with naturally thick, straight, shiny and silky black Asian hair. But - as with everything in life - I wanted what I didn't have: different hair! *confused at self-logic*

INTRODUCING MY SAVIOUR!


By using this treatment I got rid of those patchy dry areas which sometimes pop up on my face in less than 4 days, with dramatic improvement after day one! This treatment has a very similar result to keratin treatments which I've had previously at hair salons! The only differences I found is a keratin treatment results are a bit better, much more expensive, and need less re-touch-ups (about once every 6 months depending on how you treat your hair and your hair type) whilst I need to use this treatment once every month for a similar result!

Since the treatment deeply moisturises my lips, I no longer feel like picking at them (since there's no dry skin to pick at anymore!) which is definitely a bonus in my case. :)

What you need:
- Unrefined Coconut Oil (about three spoonfuls - varies according to length and thickness of hair but don't worry, there's no such thing as too much! Just use common sense)
- A microwave safe bowl
- A spoon
- A paper towel
- A hair elastic
- A shower cap/plastic bag


This jar was around $25 AUD but will last a very long time (about a year for my long, thick hair)
So have a jar/container of unrefined coconut oil (aka. organic), this is better since you don't want to be putting more harmful chemicals on your skin and hair then you probably already are. Refined coconut oil is best used for cooking but that's not the intention of this oil! ;)

I bought this jar for around $25 AUD from my local health store Healthy Life (I bought this in item in an actual store - woah - but they have a website, just CLICK HERE), but you should be able to find this in any health store/health section. :)

The unrefined coconut oil is a solid at room temperature (25 degrees Celsius) but since I live in Australia where the "room temperature" is about 1000 degrees, I store my jar in the fridge or it will quickly turn into a liquid. This is optional since it doesn't matter what form it's in but I personally find it easier to handle a solid treatment then an oil when making up the treatment!

I probably shouldn't have used a white bowel to show the amount...
Take two or more spoonfuls (more if needed: I use about 4 spoonfuls for my face and hair) and scoop it into a microwave safe bowel (one which does not absorb oil).

Begin to microwave and every ten seconds take the bowel out and mix! Do not microwave with the spoon please. The mixture will slowly begin to melt, don't microwave with long intervals as you may risk burning the oil and creating a lot of bad smells which your family/roommates probably wont appreciate.

Keep going for about 40 seconds to 2 minutes depending on your microwave heat settings until it becomes this clear mixture! It should be warm oil without being hot/boiling!

Before using this oil, put the bowel onto a paper towel or any towel to catch any drips which may escape your fingers when you apply the treatment!

I start off with my face first, for hygiene purposes, and apply to a freshly cleansed dry face with my clean fingers. I rub in gentle circular motions and focus on the areas which need the moisture the most! Unrefined coconut oil does not clog pores and is a good natural remedy which has been used for centuries for soft, supple skin. It evens out skin tone, it decreases dryness, it reduces the appearance of fine lines and wrinkles, and it also promotes healthy hair growth! So I also apply this oil onto my eyelids, eyebrows, and eyelashes to replenish the hairs there! I also apply it to my lips and on my neck or any other dry places of my body.

As you can see, my fingers are shiny from the oil I just applied to my skin.
I'm very methodical with how I apply any hair treatment. I follow a method which my favourite hairdresser showed me when I got my keratin treatment done. It's exactly the same method I use to curl my hair.

ALWAYS APPLY OIL BASED TREATMENTS TO DRY HAIR AS OIL WILL NOT MIX WELL WITH WET/DEEPLY SATURATED HAIR!

METHOD: Start by separating your hair into three layers (split above your ears and below your ears) and grab one inch strands from each layer and work the treatment into that section by quickly running your fingers and pressing gently.

This is especially useful for people with really thick hair like myself as it's easy to miss sections.

The end result should look something like this! :D
I massage some of the oil onto my scalp and hair roots as well as it actually helps to prevent hair fall out and increase hair growth rate! I then tie my hair up (optional but I need to because it's too long and heavy to stay in a shower cap by itself), and put on a shower cap to keep the heat from the oil in which allows it to be more quickly absorbed into my hair.

I leave this treatment in for 30 minutes to an hour and wash it off with a good shampoo and conditioner in the shower after. You can leave it for less or more depending on your needs. I do this treatment every time I get dry skin or at least once every month!


THE RESULTS:

See for yourself.
The photo does not do it justice. It's heaps glossier and soft like a cats fur! :3

It's a hell of a lot cheaper than keratin treatments too.


Stay Beautiful! xx


TheBalm Betty-Lou Manizer and Mary-Lou Manizer Review

Where there is highlighter, there is bronzer (and I'd like to think vice versa!).

Oh look, more of TheBalm cosmetics! Why is no-one surprised? Betty-Lou Manizer is a shimmering bronzer and Mary-Lou Manizer is a shimmery satin gold highlighter.

Inside the Mary-Lou Manizer.

Close up Photo - No Flash.

Swatch of the Mary-Lou Manizer.
This is definitely a yellow/warmer toned base highlighter and although it is a powder, it does not feel drying on the skin at all. It's almost a transition between a cream and a powder so it's a bit risky to apply (risk of over-application!). I found the best way to apply this highlighter is using a light hand and a stippling brush!

This highlighter would suit any skin tone, it can be toned down for everyday casual looks and amped up for formal occasions. The best thing about this highlighter is: it does not budge. Similar to the high beam by Benefit, this highlighter will last all night through dancing and partying - even in Australian summer weather!

Inside the Betty-Lou Manizer.

Close up photo with no flash.

Swatches of the Mary-Lou Manizer (top) and the Betty-Lou Manizer (bottom).
I'm going to be completely honest, I much prefer matte bronzers simply because they look more natural and suitable for any occasion. However, this bronzer has completely changed that view! Although I'm still a massive fan of matte bronzers (I swear by it for natural contouring), shimmery bronzers are also very good. I wouldn't use a shimmery bronzer for a natural beauty look but for an evening out (especially if there will be a LOT of photos being taken), this particular bronzer is amazing!

In conclusion, while I reach for this bronzer a lot less then my matte bronzers, I would still repurchase if I ran out of Betty-Lou Manizer simply because it adds that "wow" effect in photos. I did not intend to buy this product, it came included in a set which I wanted purely for the value of it - but this bronzer has become my favourite item from that set!

I bought TheBalm's "Oh So Pretty" set which included the Betty-Lou Manizer for $48.96 USD from Feel Unique. You can visit the exact page by CLICKING HERE (non-sponsored link). Or you can just buy the Betty-Lou Manizer by itself from Bath&Unwind for $22.92 USD by CLICKING HERE (non-sponsored link).

I bought my Mary-Lou Manizer for $22.92 USD from Bath&Unwind. You can check it out by CLICKING HERE (non-sponsored link).

All products were purchased with my own money, I am not affiliated with any of the websites mentioned on this blog, and all websites have been checked to be official resellers of the brand! :)


Stay Beautiful! xx


Benefit Posietint Review

Let me start by showing you all my current Benefit Cosmetic collection:

To date: 29/11/2012!
I am currently awaiting another order to arrive from Benefit (should be within the next few days but shipping is very unpredictable during Christmas season - to be expected of course!). I will post a picture of that when it arrives here. :)

CLICK HERE to visit the official Benefit Cosmetics website (free shipping for orders over $125 AUD, free samples, legitimate, promotional offers, a lot cheaper then buying in Australia)!

The boxes/anything still in it's packaging are back-ups. I'm a bit of a hoarder when it comes to make up. But I'm sure you're worse, and that's okay with me. :)

Benefit Cosmetics - being one of my holy grail brands - contains a lot of products I use in my daily routine.

Benefit's PosieTint - Lip and Cheek Stain ($29.00 USD).
Bright blue-toned pink lip and cheek stain.
As you can see the applicator and bottle and similar and design and style as the High Beam by Benefit. However, the bottle is more plastic and not glass like the High Beam is. The pink works well on my skin tone when applied to my cheeks (I'm a light-medium, yellow-toned colour) but not so much on my lips unless I blend/mix it with some other lip products.

I love using stains on my cheeks because you can intensify the colour with a powder or even a cream blush and if that rubs off, the stain will remain on the cheek for hours to come! It works by being absorbed into the most superficial layer of the skin (easily exfoliated off during make up removal)!

A swatch of the Posietint once dried and blended out.
It is easy to blend out and control the colour intensity of the cheek tint once you become familiar with practice using the tint. It can be as pigmented and as subtle as you want. A bottle will definitely last you more than a year even if used daily, you only need two drops to be honest!

I definitely recommend this tint, it works well on most skin tones, easily blendable, will last a long time even if used daily, and looks amazingly natural in any lighting. It has a matte finish and can be layered with other types of blushes for different looks!

Stay Beautiful! xx

Wednesday, 28 November 2012

Benefit High Beam Review

I have so many highlighters and illuminators, it's becoming ridiculous. I think there's something inside every girl/guy/person which is attracted to all things shiny. Please tell me you're the same - I need people to be as dysfunctional as myself when it comes to this.

Anyways, I'm pretty sure one of the very first times I have ever tried a highlighter was with the Benefit High Beam ($26 USD). 


Ta-Da! ;)
I remember one of my best friends had it and I was trying some out in her dark bedroom (sounds pretty creepy right?), I - obviously with the lack of light - didn't see any difference and proceeded to go out the entire day with highlighter only on one cheekbone! Talk about the ultimate lop-sided face!


Anyways, remember how I mentioned TheBalm is one of my holy grail cosmetic brands? Well Benefit is another, I love the scents, style, and advertising. A+ Benefit, you passed the test!

I buy all my benefit cosmetics from the official Benefit cosmetics website! There are imitation Benefit cosmetics (*sigh* whyyyyyy?), it's a lot cheaper than buying from Myers or David Jones (although you should visit to try out the colours, textures, etc. before buying a product), and the site has free samples, heaps of promotions and free shipping for orders over $125 USD. What more could you want?

CLICK HERE to visit the official Benefit website!

The Applicator.
The High Beam is a pink undertoned, hydrating, liquid highlighter which uses a nail polish applicator. The bottle is just larger than the size of the average full-sized nail polish bottle. This highlighter will not budge so blend it in quickly before it dries! It will last all night, through any weather - an I live in Australian weather and go out a lot so that's really saying something!

Notice: The faint pink undertone.
The result after a bit of rough blending, I waited too long and it has mostly dried. I literally rubbed it with a dry towel and it didn't budge a bit. As I'm typing, I keep glancing at my shiny hand... Ohh ~

Personally, I wouldn't use this highlighter (at least not very much of it) for everyday casual wear. However, in photos and on nights out, it looks incredible. Like your skin is glowing from withing. I have light yellow-undertoned skin and even I have received compliments whilst wearing this highlighter.


Stay Beautiful! xx


Teeth Whitening Review - Crest 3D White Strips Review


My parents have taught me to invest in my teeth from a very young age. I always had to visit the dentist at least once a year while growing up, had regular cleans and check ups, brushed my teeth at least twice a day, rinsed my mouth after eating, etc. When you really think about it, teeth are so incredibly important. They are key in expressing ourselves and some people who perhaps realised this too late suffer from being self-conscious of their less-than-perfect teeth.

No one's teeth are 100% perfect. Different teeth shapes form for different jaw lines, skull protrusion and lifestyle habits. Mine for instance, I've had braces while I was in high school, had wisdom teeth pulled out and some molar teeth removed to make room for the braces. Clearly teeth are a big investment in my life, so whitening them would be a no-brainer!

I use Crest 3D WhiteStrips which I buy from an authorised reseller of the product - Whiter Smile. If you're going to put hard chemicals straight onto your teeth at home, make sure it's the real thing! I know they make imitation Crest WhiteStrips which I have previously bought off eBay (and threw out!). It's pretty sad that people are now trying to profit at the cost of your oral health! :(

I bought 2 boxes of Crest 3D WhiteStrips for $100 AUDThere are 56 strips in each box (TOTAL OF 112 STRIPS)!

Suggestion: Start off with the Sensitive Pack, see what your pain threshold is like.
Sensitive Strips!

56 Strips per box (28 pairs)!

CLICK HERE to go to the direct link where I bought these strips from! Last order I made, I got a free full-sized tapered dental toothbrush and whitening toothpaste with my order. Shipping was very affordable to Australia (UNDER $15 AUD).

These strips contain a chemical known as Hydrogen Peroxide which is the same chemical used by Dentists during professional teeth whitenings. You will find that all whitening strips (especially in Australia where our FDA laws are very stringent), use a chemical known as carbamide peroxide. This chemical helps to prevent stains and whitens very slowly over a long period of time. It is painless and is very unlike to cause any bad reactions. The only problem isit will have no effect on deep stains (e.g. cigarette smokers, daily wine drinkers, etc.) For that effect, you'll need the Hydrogen Peroxide which will penetrate deep into the enamel and lifts the stains with an oxidising action.

ANYWAYS ENOUGH WITH THE SCIENCE!

I've been using these strips for a few days every month (I don't drink alcohol, smoke, drink coffee or tea, etc.) so my teeth have never been deeply stained. But even with these strips, my teeth went from normal cream enamel colour to white. How whiteWhite enough that I can wear warm-toned red lipstick without looking like I have yellow teeth!

I used one pair of strips a day for about a week before I started getting some (very light and tolerable) aching and I decided to stop. I use a strip every few weeks when I feel like I need a touch up. I'm pretty sure my dentist thinks I'm cheating on him since I saw him a few months ago and he commented that my teeth had been "professionally whitened" by someone else! Hahaha :)

If you're not comfortable whitening your own teeth, I suggest going to a dentist. I've done this before with the same results and you get to lie back and watch movies while it works! ;)


Stay Smiling Beautiful! xx


NP Set Jet Set Palette Review

Palettes can easily be expensive (especially the really good quality - near orgasmic - ones). Being a self-diagnosed make up snob by default nature, I was walking around Target one day and found this palette from NP Set. I swatched it just for the sake of it, expecting it to be chalky and laughable like the snob that I am (hey, at least I'm honest about it okay?). So imagine my surprise when it was good. And I mean, it was rrreeaaalllly good. Just a bit of background information about NP Set. Unlike Napoleon Perdis which can only be sold at Napoleon Perdis Stores, NP Set is a cheaper drugstore brand. Similar to Marc vs. Marc Jacobs.

Therefore, this drugstore palette - which retails for $39 AUD (I bought it on promotion and got a free NP lipstick) - is of amazing quality! I'm not even kidding, this relatively inexpensive palette is incredibly pigmented, the colours are smooth and easy to apply, and the shadows are creaseless. This palette has eyeshadows that are in the same league as my Urban Decay Naked Palettes and my TheBalm Palettes (Nude'Tude in particular)! And at a fraction of the price!

Jet Set Palette (Inside)
It features 18 highly pigmented non-chalky eyeshadows, 2 blushes, 1 highlighter and 1 bronzer. Underneath the NP Set flap there's a mini mirror, 4 lip glosses and some applicators. The applicators, lip glosses and blushes do not appeal to me greatly and they were to the mediocre standards that I've come to expect from most drugstore palettes but the majority of the 18 eyeshadows were a-maz-ing! *Emphasis on every syllable is required*

The palette is small enough to fit into your bag easily, not so much if you only use a purse though.

Swatches of all the colours, apologies for the mess - I was meant to be cleaning!
This image unfortunately does not do the shadows any justice. They are incredibly shimmery and there are a few matte shades as well included in the palette. The lighting the day I took this image was terrible (a lot of glare).

Anyways in conclusion, if you're looking for an inexpensive alternative for expensive high-end eyeshadow palettes, appreciate/need/want a neutral palette, or want a palette with plenty of colours and textures to play around with that wont break your bank; this palette is for you.

This palette made me realise that there are some real gems in drugstore brands. It doesn't have to be high-end to be good!

Stay Beautiful! xx

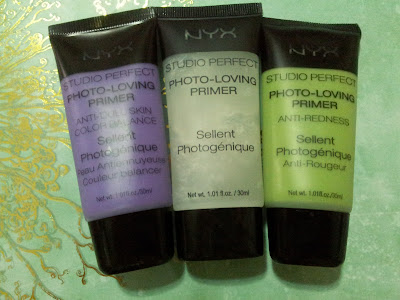
Primer Review: NYX Studio Perfect Photo-Loving Primers

Primers are such an important, yet somewhat basic step for make up application. It prolongs make up; provides a smooth base for cream, powder or liquid product application; increase intensity or trueness of colour/pigmentation; provide SPF protection; even out skin tone; hydrate or moisturise; and many more things! They have primers which decrease pore sizes, prevent wrinkles, illuminate, or mattify skin. Primers are quickly becoming so diverse and the selection is only going to keep growing!

Needless to say, I love primers! I wouldn't apply make up without a good primer as a base anymore, it makes my make up feel heavy - if you know what I mean.

I bought all three types from Cherry Culture, they retail for $12 USD each!
NYX is considered to be a drugstore brand, which means it's affordable and easily accessible. I bought these from a website known as Cherry Culture, CLICK HERE to view the page where I bought these from. From what I can remember, shipping to Australia was inexpensive because I made a large order. All of these NYX primers are animal cruelty free and do not test on animals (I'm just stating what's printed at the back)!

You may be wondering why anyone would want to be purple or green, these are colour correctors. Green balances redness and purple brings colour back to dull skin (I get dull skin when I'm sick for example). When using any coloured primer, remember to blend well and allow setting time before application of foundation to prevent a sickly green or purple tinge. However that will not be an issue with these primers since they blend out completely (and rather pointlessly) clear.


Anti-Redness Tube and Swatch.

This is their anti-redness formula due to green colour of the primer. When blended, it becomes translucent (without even a green sheen). Unfortunately, coloured primers are next-to-useless for counteracting and correcting colour irregularities unless a VERY large amount is used. If anything, this may slightly reduce redness but with very subtle results. Don't expect any miracles in regards to colour correction.

Anti-Dull Tube and Swatch. You can see the oily texture (good for dry skin - which is often more prone to being "dull")!

Remember that scene in Edward Scissorhands where the Avon lady slathers purple cream all over his face to "bring back colour" but it only made him look awkward and strange? It's actually one of my favourites scenes purely for the ambiguity of the moment.

Well, this purple primer is meant to work like it was intended to in the movie. The only thing is this also blends out clear (no purple undertones either) - so unlike the costume make up purple primers which actually work to bring colour back to dull, gray skin - this primer will have as much effect as the anti-redness mentioned earlier unless it is literally slathered on unforgivingly. I use this on days I'm sick and colourless but the results are mainly in my mind.

The Original and Swatch.
My personal favourite of the set! This primers decreases fine lines without settling into pores/lines, it's mattifying and the formula isn't anywhere near as oily as the anti-redness and anti-dullness versions of this primer. In this case, the original is definitely the best in my opinion!

 Please remember that what works for me may not work for you and vice versa. Make up is fun, enjoy experimenting and playing around with different ideas. These primers are relatively inexpensive for 30mLs of product, all of them blend very well, and make good additions for any make up kit. So if you're thinking of giving it a go - why not?


Stay Beautiful! xx


Beauty Problems! - Sigma Stained Brushes! (RESOLVED)

Shortly after receiving my much-wanted Mrs. Bunny Brush Set from Sigma, I washed them with some soft baby shampoo and dried them completely. The day after they had dried, I used these brushes for make up application for my little sister's formal.

My Sister's Teal Eyeshadow look! :)
It suited her dress very well and these photos really don't do it justice! :(


Now here's a little fact about Synthetic/Vegan brushes, they are incredibly multi-use because they do not absorb product into the actual brush bristles, especially when compared to animal hair brushes (even high quality natural bristles have a higher rate of product pigment absorption). After using a brush for an extended period of time (usually this means years), the staining of a make up brush is basically inevitable (there are many methods to prevent this for many years though which I will explain in a future blog). Cream and liquid products are a lot more likely to stain bristles then powder/dry products. Therefore, synthetic bristles are well-suited to being used for all types of products (cream, powder, liquid, etc.) without the same risk of staining as natural brushes.

Anyways, back to my Sigma brushes. I used a lovely teal blue colour which suited my sister's dress as an powder eyeshadow for her look that night. It turned out beautifully and I immediately spot cleaned all my brushes including my F70 Concealer brush. After an hour, I went to deep clean my brushes and the F70 was stained. It didn't matter how much I deep cleaned that brush, the stain would not budge! I owned multiple make up brushes at the time and I had never had a problem with staining or the eyeshadow which I had used. I had also used that exact powder eyeshadow with my other brushes from the same kit and there was no staining. I am aware that this brush is intended for concealer use but the beauty of synthetic brushes (or any kind of make up brush) is that you can use it for whatever function you want! This rule applies more  with synthetic brushes!

Brush after several deep cleaning sessions, the bristles are clearly stained with a deep teal colour! >:(


My biggest frustration with this issynthetic brush which I used for the first time after cleaning with a powder eyeshadow managed to stain, an hour after usage and spot cleaning, when other brushes from different brands and even brushes from the same set resisted staining.

Now don't misunderstand: the F70 brush applied product like a dream and was incredibly soft and precise. Also since staining is inevitable over time, it doesn't matter how "pretty" a brush is, as long as it does an amazing job, it should not be thrown out. However, I was still frustrated so I emailed customer support at Sigma and received a reply within 24 hours offering support with the situation. Once they realised that the brush was clearly stained, they sent me a new one which arrived today!

Aaannnddd... you're officially forgiven. :)


Now I'm not sure if I had received a faulty brush (considering synthetic bristles should not have stained that easily/quickly), or if it was to do with the white bristles (despite the other brushes with the white tips being stain-free after using the same way), or that the brush is really not for eyeshadow (concealer can stain too! So I'm not entirely sure what this brush is 'for'). After much searching and asking around I found that a lot of people have had the exact same problem with teal blue powder shadows staining! So it may have been the colour selection and I just got unlucky.

Anyways, the lesson is:
> Be careful with using white tipped bristles with pigmented shadows.
> Be wary of the beautiful vibrant teal blue colours as they are the colour which is most likely to stain even the most expensive of brushes (e.g. MAC).
> Sigma has good customer service and will graciously offer a replacement brush.

Stay Beautiful! xx

TheBalm Meet Matte Eyeshadow Palette Review

There are certain brands out there that I consider to be my holy grail of make up. Literally almost everything from these brands seem to suit me perfectly. They're affordable (or at least worth the money/time/effort), work well, last long, and are incredibly pigmented whilst being versatile. TheBalm is one of these brands.

I am a massive TheBalm fan, everything that I have from the brand has been an massive success. That being said, there are still plenty of things from TheBalm which I haven't tried yet.

UPDATE: I have just discovered that TheBalm official website now ships internationally! International shipping is a flat rate of $40AUD which is pricey considering the large wishlist I have! My suggestion is to wait for the next Cyber Monday sale since they're often at 40% off RRP. I've already gotten everything I really wanted from the brand, I'm now just shopping for the sake of it. ;)

Anyways, onto my review, presenting the good-looking Matte ($38.40 AUD):

A small purse-friendly palette.

Inside.


The eyeshadows have the most quirkiest names! Matt Ramirez is a good neutral toned brow powder.

The Back.

The applicator that comes with it, I never use these since I prefer full-sized brushes.

The shadows are - obviously - all matte textures, highly pigmented, easily blendable and very versatile with a variety of different looks. It's perfect for if you want a matte contouring of the eyes or a matte base for highlighting of the brow bone. I haven't found one bad thing about this palette, I'm sold! It's reassuring to have a palette that's full of matte shades considering there are mainly shimmers in most palettes now.

I bought most of my TheBalm products from Bath&UnwindCLICK HERE to visit the Meet Matte palette which I bought in a new window. The website has free (and extremely quick) shipping to Australia for orders over $108 AUD.

My first ever order from Bath&Unwind of products from TheBalm <3


Stay Beautiful! xx


DuWop Rotating Map Palette Review

I would like to think there are people other than myself who are obsessed with eyeshadow palettes. Despite having plenty to last me quite a few years even if used daily, if anyone dangles a palette in front of me (especially if it's pretty), I will probably buy it. :(

Que: The DuWop Rotating Map Palette ($48.08 AUD).

Previous to this palette, I had only heard of the DuWop brand from their semi-famous lip venom vials which are supposedly meant to have extreme lip plumpling results. I have yet to try these as I have tried waaayy too many lip plumps already with minimal results (possibly placebo results..)

Anyhow, the DuWop palette really appealed to me for many reasons. I didn't own anything from the brand and wanted to try it out, it is an official collaboration with the Pirates of the Carribean movie, and it was a rotating palette (how quirky is that?).

However after using the shadows I've found many pros and far too many cons for the price that they were selling it at. I'll explain a bit further down.

Front

The photo does not do this packaging justice, it is the most amazing holographic cover I have ever seen. Also the palette is hugeI'm not kidding, it's wider than and A4 page and about 3/4 the height, definitely not pocket sized. This palette was meant to be displayed! It is that pretty.

Inside : separated with a clear sheet, the lip glosses are covered with resealable plastic to prevent drying, however the liners are left exposed (go figure).
Upon opening, you find the following map. It's the same map which is used in the Pirates of the Caribbean movie which I love. The shadows are very appropriately named, e.g. 'the black pearl', which really follows the theme! The palette does rotate but it will actually require some serious pushing, there's no chance it will accidentally go spinning around which is brilliant since I don't like my eyeshadows flying away from my brush when I go to dip it in.

Back
The back cover is so pretty, there are spindly patterns branching out in shiny gold ink with a glossy finish. 

Loved the movie <3

Okay so packaging wise, this gets a A+. This palette is always sitting on my vanity table for display purposes due to it's prettiness. It's amazingly perfect to look at and would make the most beautiful gift for someone! If that person isn't used to amazing eyeshadows...

Some of the eyeshadows close up!
In the pan the eyeshadows look like the most amazing colours. All colours are satin or shimmer texture (no mattes) and very unique colours I rarely see around which is amazing. However..

Swatches of most of the colours, I had to dip my fingers in a few times. :(

When swatched the shadows are incredibly - not exaggerating - sheer. Even with a primer and a base colour, you may have to work to make some shadows show up. On the other hand, a few shadows of the palette are more pigmented but not incredibly amazing like TheBalm Nude'tude palette or the famous UD Naked Palettes. The gel liners in the palettes dry quickly, smudge on application, and are also not very pigmented.

The pros are the shadows do not crease (even if you don't use a primer), and they make good over-shadows for a sheer wash of colour. They are unique colours but require a bit of time and patience during application. Surprisingly, the lip glosses are amazing. If you knew me, you'd know that I intentionally try to avoid palettes which include lip glosses since they are prone to drying and are usually pretty bad quality to start off with. However, the lip glosses in this palette look amazing, have good staying power and don't look like something you can get from a 12 year old Barbie play set - if that makes sense.

Swatches of the three included lip glosses!
Okay so that's my personal opinion of this palette. What it lacks in product pigmentation, it makes up in packaging. The eyeshadows being sheer are my only issue along with the gel liners. The lip glosses were a surprising success. Altogether I was expecting something more impressive for the price but it is a decent product.

If you want to try it out, I bought mine (with my own money) from BeautyBay. You can click the link HERE which will open in a new window.

Stay Beautiful! xx